If you liked the post, Share on Facebook, Tweet and Google Plus (use buttons above). You can also Subscribe to our feed via Email for free.

 |
Installing Linux in Windows using VirtualBox
on 03 October 2011
Do you hate dual-boots? Dual-boot or Multi-booting is installing multiple operating systems on a computer, and choosing which one to boot when starting the computer. I really hate it. I only keep one OS on my machine i.e. Windows. But what if some situation arises when we have to use any other OS like Linux?
There ia a software called Cygwin which is a Unix/Linux like environment and command-line interface for Microsoft Windows. But Computer Geeks like me will never get satisfied with such fake environments. So the only option which remains is to use Virtual Machine (VM) to install Linux under Windows.
What is Virtual Machine?
A virtual machine (VM) is a isolated guest operating system installation within a normal host operating system. In simple words it is a software used to install an operating system(guest) within an other operating system(host).
There are various Virtual Machines (VM) available in the market. Some of them are free to use and some cost you some money according to their features. But don't worry we aren't going to spend to a single buck. The most popular Virtual Machines are Oracle Virtual Box from Sun Microsystems, Virtual PC from Microsoft and VMware.
In this tutorial I am going to use Oracle VirtualBox and Ubuntu distribution of Linux. You can install any other Linux distribution like Fedora, Red Hat Linux, Debian, Gentoo etc. in this way. Not just Linux, VirtualBox runs on Windows, Macintosh, and Solaris hosts and supports a large number of guest operating systems including but not limited to Windows (NT 4.0, 2000, XP, Server 2003, Vista, Windows 7), DOS/Windows 3.x, Linux (2.4 and 2.6), Solaris and OpenSolaris, OS/2, and OpenBSD. You can even install Windows XP inside Windows 7!
How to Install Ubuntu on Windows
1) Download & Install VirtualBox
The first thing you have to do is obtain VirtualBox. Visit the VirtualBox's download page. From there download VirtualBox for Windows host and then install it.
2) Get a Ubuntu disk image (.iso file)
Go to the Ubuntu releases website, scroll down and download a suitable .iso file according to your requirements. ubuntu-11.04-desktop-i386.iso for a Intel machine or ubuntu-11.04-desktop-amd64.iso for AMD machine. The file size is more than 680 mb so I will recommend to download it using torrent. To download it from torrent use ubuntu-11.04-desktop-i386.iso.torrent.

3) Creating a Virtual Machine and a Virtual Hard disk
Launch VirtualBox and click on New to create a new virtual machine. When the New Virtual Machine Wizard appears, click Next.

You can give any name to the Virtual Machine but here we are installing Ubuntu so it makes sense to name it Ubuntu. You should also specify that the operating system is Linux.

Now VirtualBox will ask you the amount of RAM(memory) to allocate to the virtual machine. If you have 1 GB or less of RAM, I would advise you to stick with the default recommendation. If you have more than 1 GB it must be fine to allocate some more memory to the Virtual Machine than the default recommendation. for e.g. If you have 4 GB of RAM, it is fine to allocate 1.5 GB. If you have no idea what RAM is or how much of it you have, just go with the default. Click Next.

Now we will create new hard disk. Select Create new hard disk and click Next. Click Next again

Now are going to create a Virtual Hard disk (which is generally a file with extension .vdi).
A dynamically expanding storage(hard drive) will take up only space what you actually use. But I prefer using fixed-sized storage as dynamically expanding storage may sometimes create problems when installing new software in a virtualized Ubuntu. Also it's write operations may be slower than with fixed size hard disks.
If you create a fixed-size hard disk, an image file will be created on your host system which has roughly the same size as the virtual disk's capacity. So, for a 10 GB disk, you will have a 10 GB file. Note that the creation of a fixed-size image can take a long time depending on the size of the image and the write performance of your real hard disk.
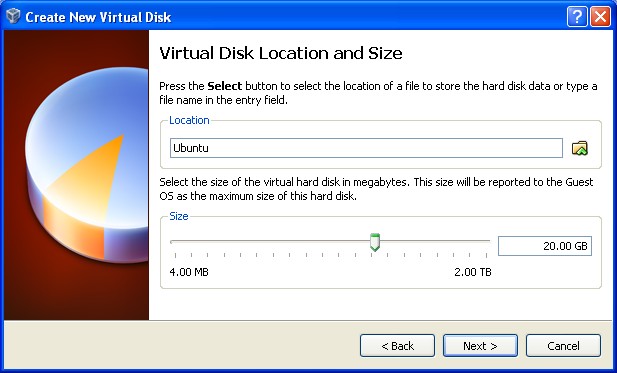
Now give the size of the Virtual Hard disk. Ubuntu's default installation takes around 4 GB. If you plan on adding softwares in your virtualized Ubuntu, you should increase the size. If you have no idea what to do, stick with the default. Click Next
Click Finish and wait for a long creation process of virtual hard disk to complete. You can just take a break and have some snacks in the meantime. After it's completion click Finish.
4) Installing Ubuntu on the Virtual Hardisk
The next thing to do is to make the (currently blank) virtual hard drive useful by installing Ubuntu (or any other OS) on it. Click on the Start tab.
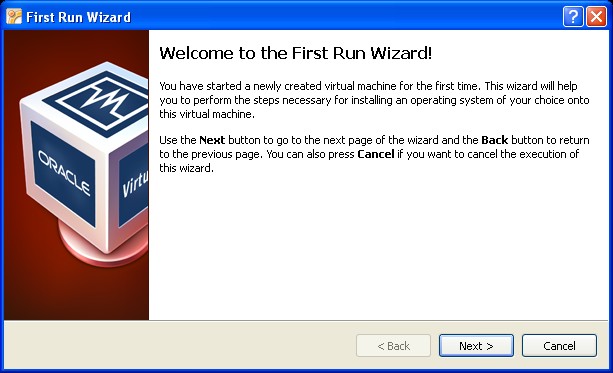
First time run Wizard will open. Click Next.

Now you will be asked to select installation media. Browse to the already downloaded Ubuntu disk image (the .iso) and select it. Click Next

Click Finish.
Now you can follow the regular installation process(which is quite simple) as if you were installing Ubuntu on a real hard drive (instead of a virtual one).


After installation is completed, in order to use your virtualized installation (instead of continually booting the CD (.iso file), you have to change the Device > CD/DVD Device entry to be Empty again.
1 comments:
Wow! I am running Linux in Windows because of this tutorial. Nice information on how to run linux inside windows. Thanks
Post a Comment